

Volume 61 brings us some new gun turret parts.

We’re in the midsection centering on the third gun. (Or the first secondary gun if you want to make it confusing.

According to instructions, we’ll start by assembling the turrent. Then we’ll put some lights on the gun deck.

It looks like a lot, but it’s just more lighting. Unfortunately, fate chose to intervene on this one.

There were four lights to install. Two of them involved the TINIEST clear parts I’ve ever seen. And as I was taking one off its runner, it did a pop fly and went winging off to somewhere, unrecoverable. I went looking and came up empty. With no other option, I decided to clip off the tip of the runner (still made of clear plastic) and use it as a substitute. It worked pretty well in a pinch. I’m sure the one that escaped will turn up after all this is over.

Four new volumes. There are some familiar-looking parts in this bunch. This ship is all about symmetry.

Hello, Volume 62. I’ve seen this before.

Looks like the first motor for the third turret. The one that will raise and lower the cannons.

One page of instructions always meant more pages of magazine, which was fine by me.

Done and ready for installing. But it took a while to get back to this guy. He went in the standby pile for several volumes.

Here’s Volume 63.

Back to the flanks, this time on the starboard side.

Again, symmetry. This is just like Volume 55.

Done. Even the magnet at the bottom is the same.

Ah, and 64 is a repeat of the simplest, dumbest volume.

This is the other motor for the third turret, which will rotate it.

Gear on peg and into the standby pile.

Ready for Volume 65.

Continuing in the midship flank section.

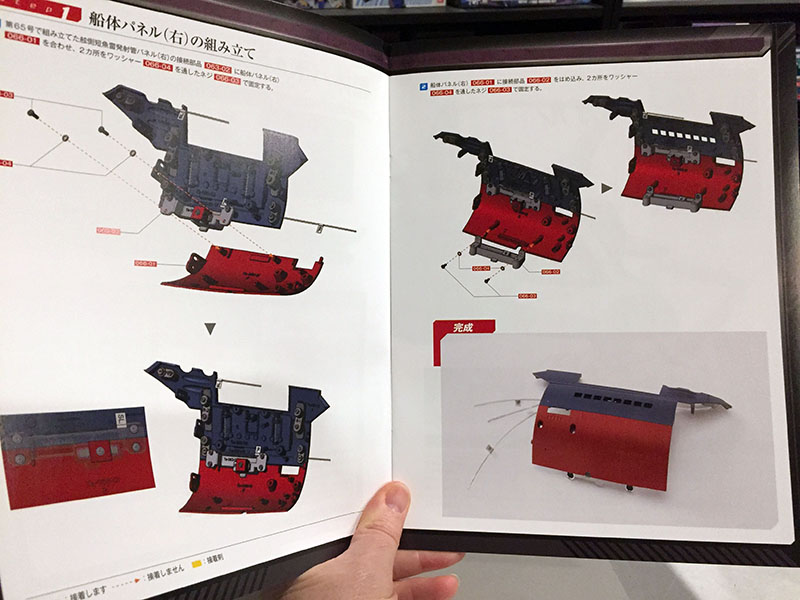
Lots of steps repeated from the port side. Assemble the torpedo launcher bit, then some lighting.

Three lights for the starboard side, one for port.

Completed. Here’s both sides for comparison.

Here are the torpedo doors in half-open position. (I’m moving the lever on the inside.)

The next batch has a lot of red in it. We’re goin’ south of the border.

Volume 66 has a lower hull plate for the starboard side.

I approve.
Just tack it onto last volume’s work.

There we go. I’m not sure what that rectangular gap is for. Let’s find out.

Volume 67 has some more red in it.

Same section, and we’ll be doing some lighting.

There are some very bright lights going into the mystery rectangle, then they get covered by a red panel. But there aren’t supposed to be lights there.

Then we’ll put on part of a “bulge” and do the fiber thing.

Another light for the starboard side.

Okay, let’s go. (They really padded out the instructions in this issue. There’s only one page of magazine content.)

There we are. Work has been done on both sides. The big lights are in and the cover is on, but it’s not secure. It just falls right off. Still not sure what’s going on here.

Volume 68 should get us closer to an answer.

With this one we’re down on the very bottom of the ship.

This is the lowest hull plate. It will have one running light.

And done. LOTS of attachment points on this guy. It’s gonna be busy in there.

Volume 69 gives us some VERY sexy pieces.
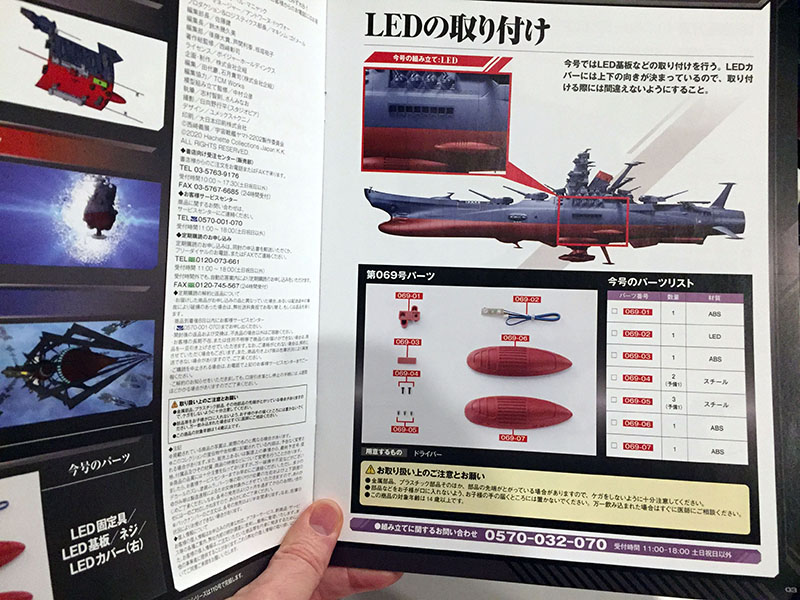
Back up to the midsection flanks.

We’ll repeat the light installation and put a cover over it, this time on the starboard side.

That’s it. We won’t do anything with the sexy parts yet.

Okay, done, and now the cover on those lights is staying put. This side doesn’t fall off. After some investigation, I discover that it’s a manufacturing flaw.

Here are both sides together with the covers in place. See the gap on the left one, running between the blue plate and the red plate? That shouldn’t be there. There’s no gap on the right one, and the light cover is just as snug as could be.
So here’s what’s going on: these lights aren’t for the ship, they’re for the wings. When the wings get stuck on (with magnets) they’ll have their own internal fiber optics. The base of those fibers will snuggle right up to these lights and transmit from there. Take the wings off, put the little covers back on, and the lights disappear.
What this means is that if I don’t want to display it with wings on, I’ll have to think of some other way to keep that one light cover from falling off. This seems like a problem I shouldn’t have to solve, doesn’t it?

The next set of four continues to have a lot of red in it.

I don’t recognize any of the parts in Volume 70, so they must all be internals.

Working on the flank section some more.

We’ll install something electronic with a lever arm on it.

Then we’ll add something to the temporary stand. Interesting.

All parts installed. There’s also a long wire we’re not installing yet. Let’s find out where we’re going with this.