
Step 1: Tunnel 1 Excavation

In order to provide access from the underground city to the wreck of Imperial Japanese Navy Battleship Yamato, Tunnel 1 is built. Because the tunnel will be excavated in sedimentary layers near the surface that were affected by planet bombing, the reliable TBM [Tunnel Boring Machine] construction method will be adopted for safety. Tunnel 1 will branch into two directions (via the H&V [Horizontal & Vertical variation] tuneling method), toward the underground space and the position of the vertical shaft for export of shear. Brances are designated Tunnel 1-1 and 1-2 Also, this tunnel serves as a geological survey for planning of excavation to follow.
Step 2: Pilot tunnel excavation

A pilot tunnel is dug in order to gain access to the interior of Battleship Yamato. The cross-section of the tunnel is the minimum size for access with construction equipment such as ground improvement machinery.
Step 3: Ground improvement

There is a concern that the strata deposits above the andesite could collapse during the excavation of the underground open space, and that the Battleship Yamato might also collapse. Therefore, ground improvement is needed in the area around Battleship Yamato prior to construction. The main tunnel extends farther into a pilot tunnel to the interior of Yamato‘s hull where ground improvement can commence.
Step 4: Shoring / Ground support

After completion of ground improvement, work expands from the interior to the periphery of Battleship Yamato. Shoring is installed to support the load of Space Battleship Yamato.
Step 5: Subterranean open space, first step

After completion of ground support construction, the underground open space will be excavated. NATM [New Austrian Tuneling Method] is adopted while building the open space with rock bolts and concrete spraying to secure the surfaces. By the time this first step is completed, it is assumed Tunnel 2 excavation will also be completed.
Step 6: Subterranean open space, second step / Shaft 1 excavation

After tunnel 2 is completed, shaft 1 while be excavated during the second stage of open space construction. Because Shaft 1 will be used for export of shear during the third stage of open space construction, it is assumed to be complete by the end of the second stage. In addition, major construction of the underground space and Space Battleship Yamato can commence in parallel.
Step 7: Subterranean open space, third step / Shaft 2 excavation
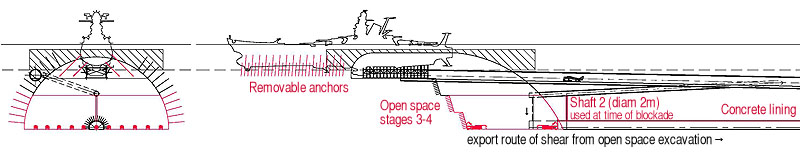
After the completion of Shaft 1, the third stage of open space construction begins. At that time, excavation of Shaft 2 begins for later blockading of Tunnel 2. After the completion of Shaft 2, a concrete lining is installed in Tunnel 2. Also, anchor installation can happen at any time in accordance with the progress of Space Battleship Yamato construction.
Step 8: Tunnel 1 blockade
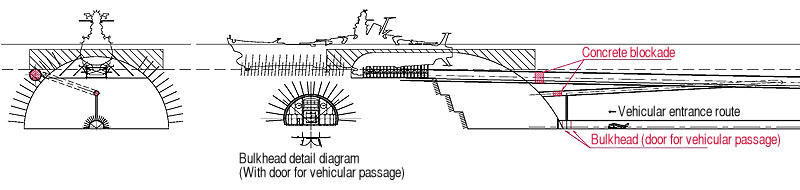
After completion of Tunnel 2, vehicle traffic to and from Space Battleship Yamato shifts to Tunnel 2. At this time, a blockade [bulkhead] is built to absorb Yamato‘s launch propulsion and prevent adverse affects on underground city. Access to Tunnel 1-1 and 1-2 is blocked by concrete. Since Tunnel 2 is used continuously until the crew boards, a bulkhead is prepared for the tunnel that enables vehicular traffic.
Step 9: Tunnel 2 blockade

After completion of Space Battleship Yamato crew boarding and equipment loading, construction workers evacuate to underground city through Tunnel 2, after which Tunnel 2 and Shaft 2 are blockaded. Due to the time limit and the need for immediacy, it is assumed sand and water will be injected into Tunnel 2 via Shaft 2.
Yamato launch process diagrams
Step 1: During battleship construction
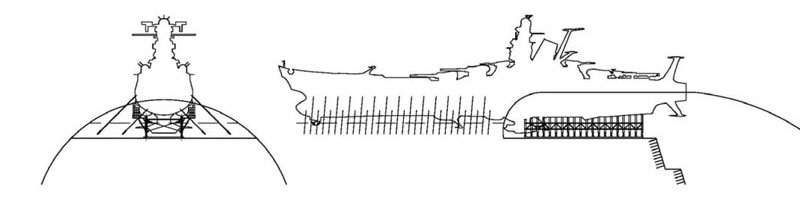
“Anti-collapse anchor” and “shoring for assembly” are installed to support the ship’s weight. Diagonal bracing and connector materials are installed for gantries to be erected for battleship construction.
Step 2: After battleship construction completed
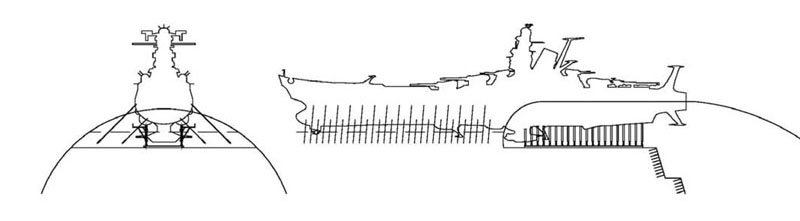
After battleship construction is completed, gantries, bracing, and connector materials are dismantled. At this point, the ship’s weight is supported by anchors (fore) and shoring (aft).
Step 3: Immediately before launch / Guided Mechanical raising of bow (Jackdown)
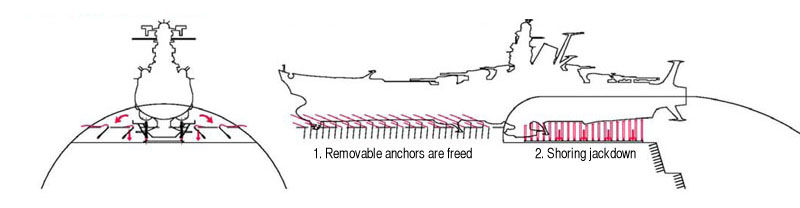
All hydraulic jack operations are intensely controlled! Anchoring method uses removable anchors!
After completion of launch preparations, all anchors are removed and pressure is released in the hydraulic lifting jack under the stern (in the lower shoring section). Jackdown commences. Since there is the possibility of battleship collapse if the jackdown timing is not synchronized, the process will be centrally controlled.
Step 4: Yamato launch / Automatic raising of bow
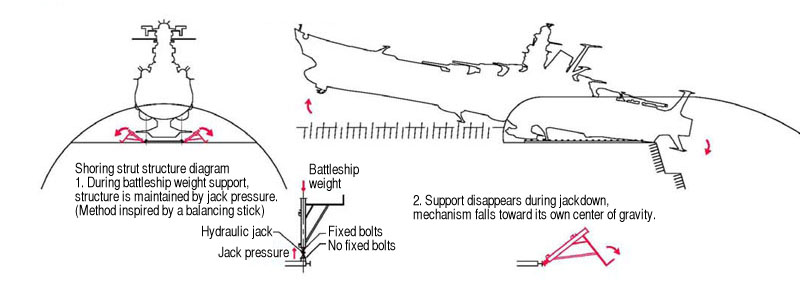
Support structures collapse automatically via weight balance!
When jackdown is performed, steel materials that carry weight distribution outward from the hull lose their balance and collapse outward. Anchors that supported the weight of the bow and shoring struts that supported the stern are detached. Battleship’s weight balance (4 fore/6 aft) centers near the third bridge and the bow begins to surface automatically.