

Reproducing the poster visual of Be Forever Yamato REBEL 3199 in a diorama!
Introducing a sample production using a curved base and gardening supplies, etc.
“Look closely. This is Space Battleship Yamato!”
Reproducing Kia Asamiya’s poster visual in a diorama
Published at Hobby Japan Web on November 9. See the original post here
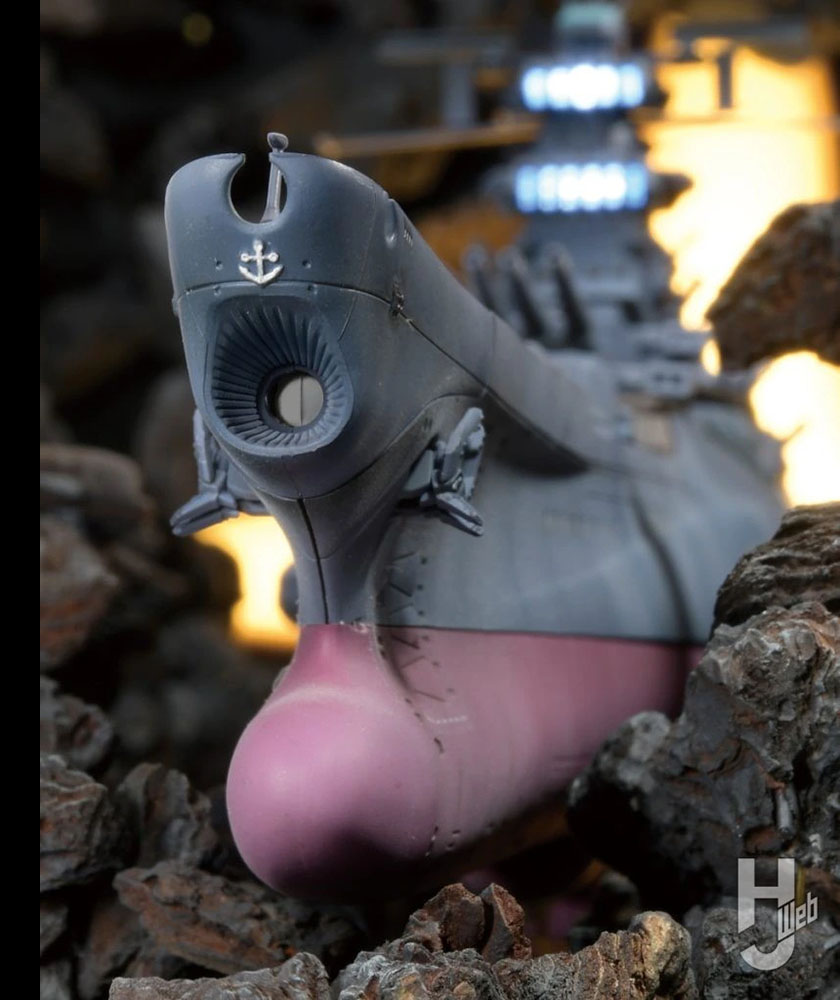
While we eagerly await the premiere of REBEL 3199‘s second chapter Red Sun Sortie, Yamato is now available for preorder as a kit in the third remodeled type: Participation Medal Award Ceremony Commemorative Paint Specification. The scale is the standard 1/1000. The anchor mark on the bow is reproduced with a three-dimensional convex mold. The content allows you to express the participation medal award ceremony commemorative paint with precise details and water transfer decals.
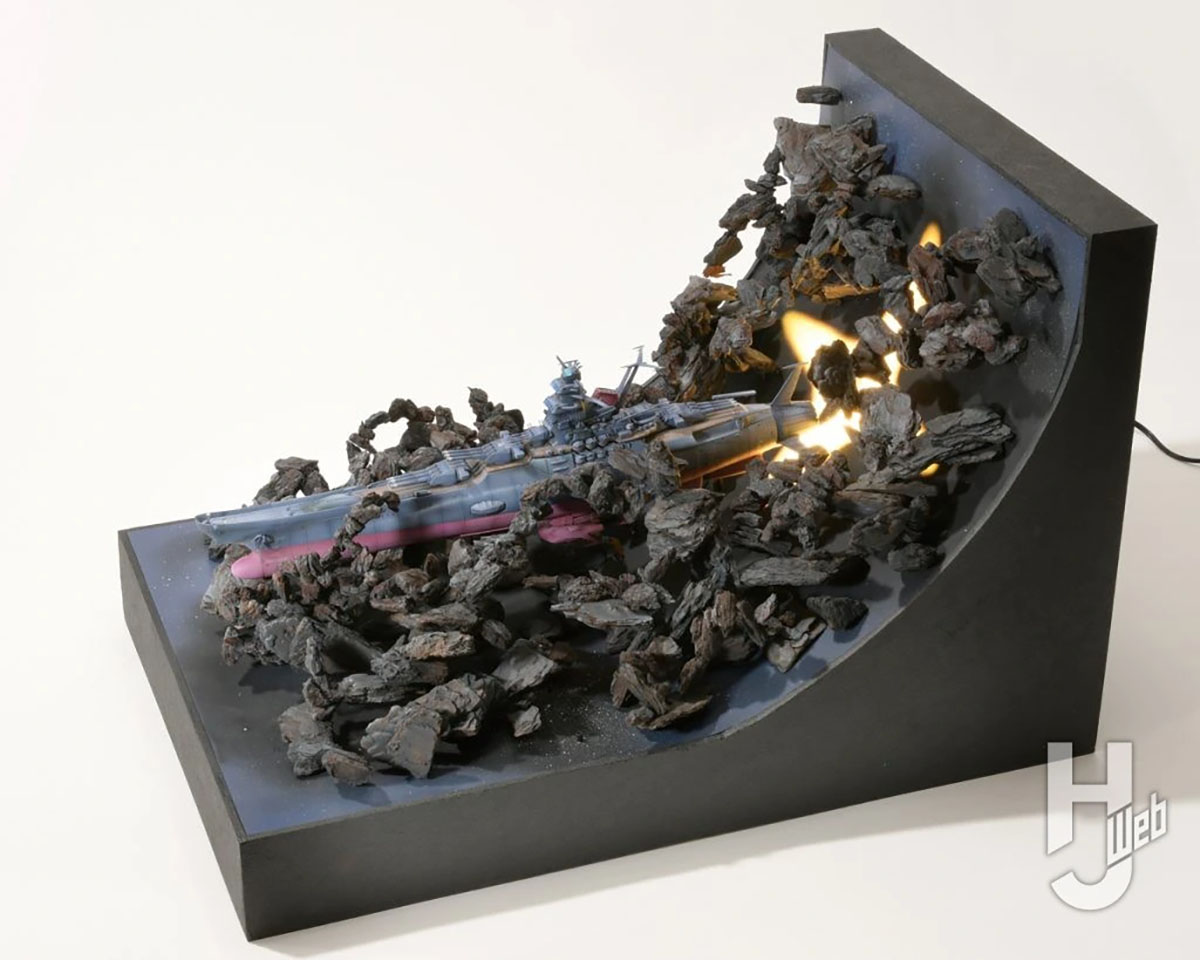
Ahead of the November 30 release, we have exclusive photos of the diorama exhibited at the Bandai Spirits booth at the All Japan Model Hobby Show, held at Tokyo Big Sight October 12 and 13. Please take a close look at this work, created by Battalion Commander Kojima to reproduce the poster by Kia Asamiya.
1/1000 Space Battleship Yamato 3199
Released by BANDAI SPIRITS Hobby Division Creation Department
6050 yen, scheduled for November 30
1/1000, 33.3cm long
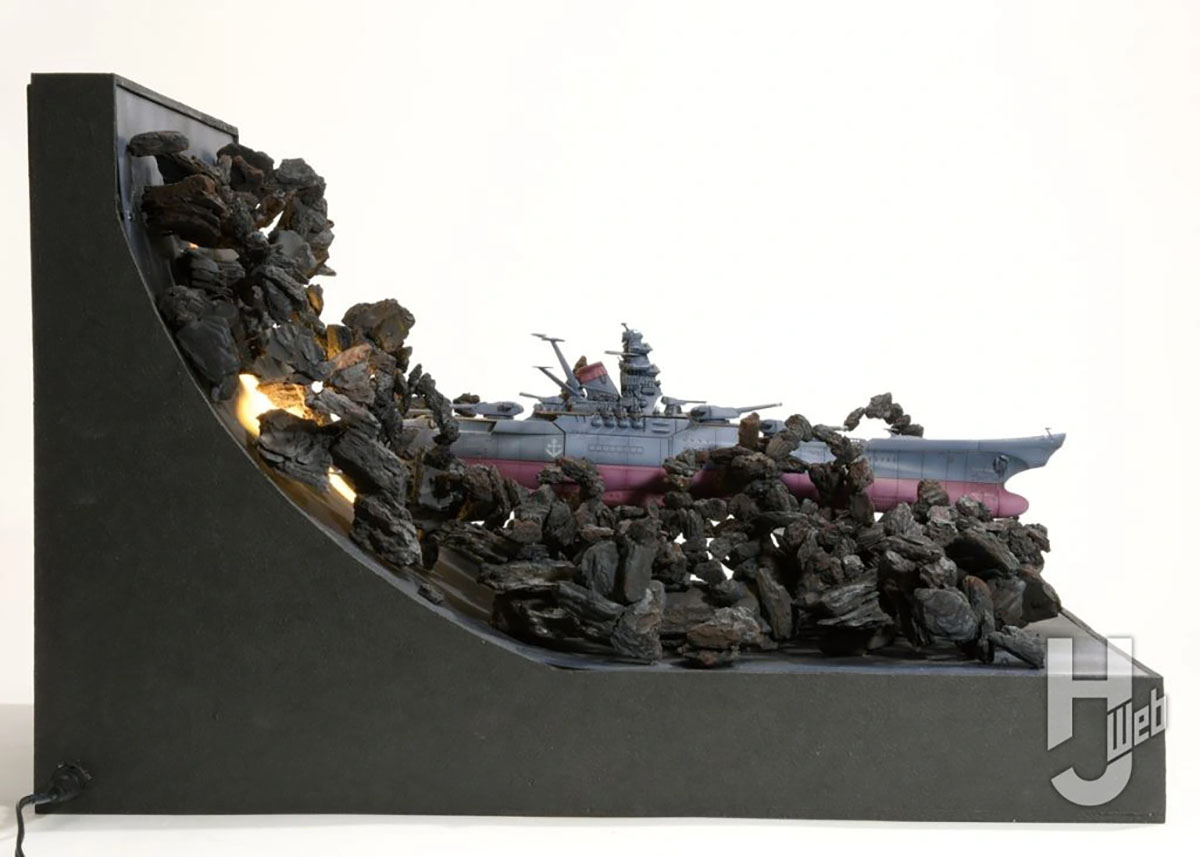
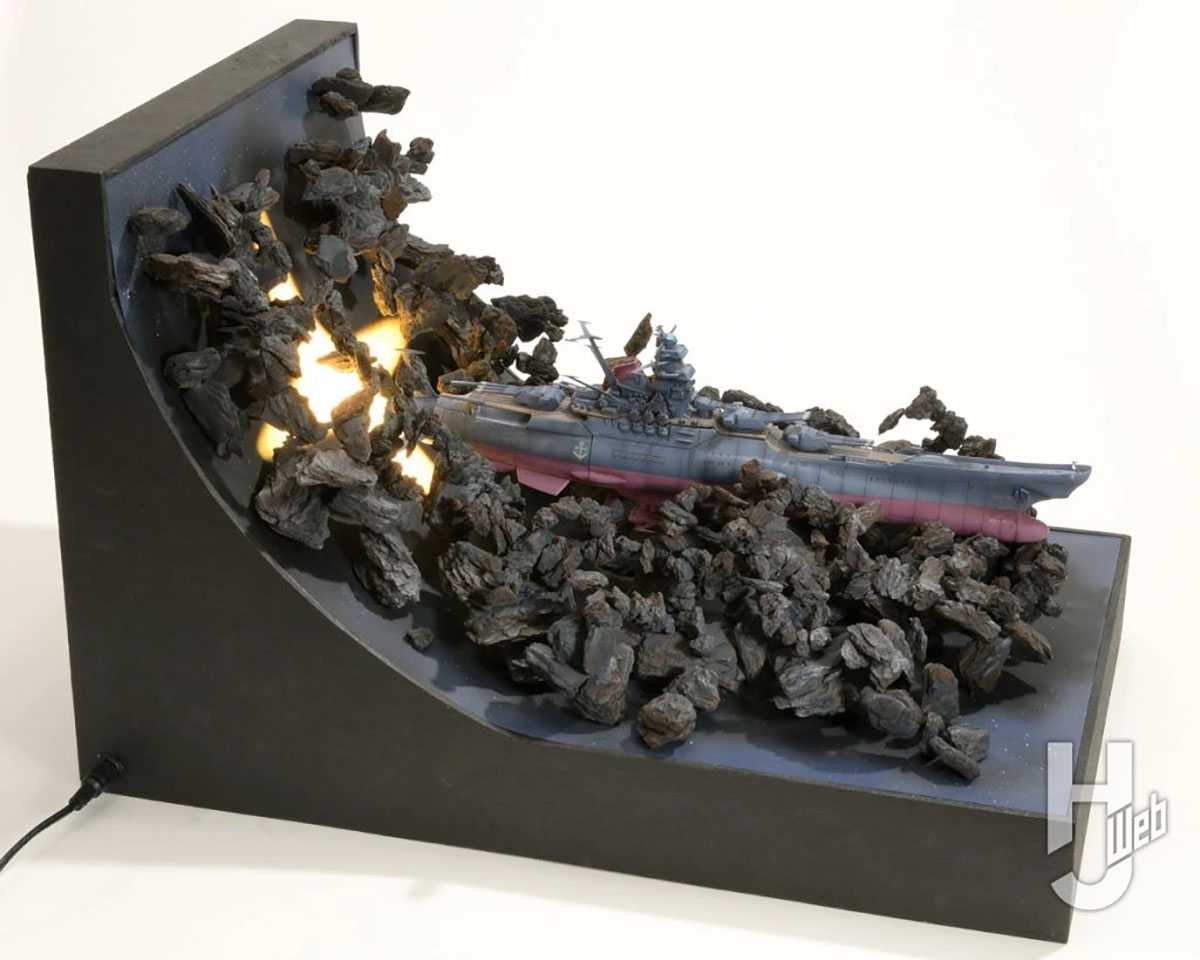
The base structure was repeatedly tried and tested to create a composition reminiscent of Asamiya’s illustration when viewed from the front, and to make it suitable for viewing as a diorama work. I especially had a hard time figuring out how to arrange the broken rocks of Icarus on the curved surface. The diorama size is 30cm wide x 38cm long x 25cm high.
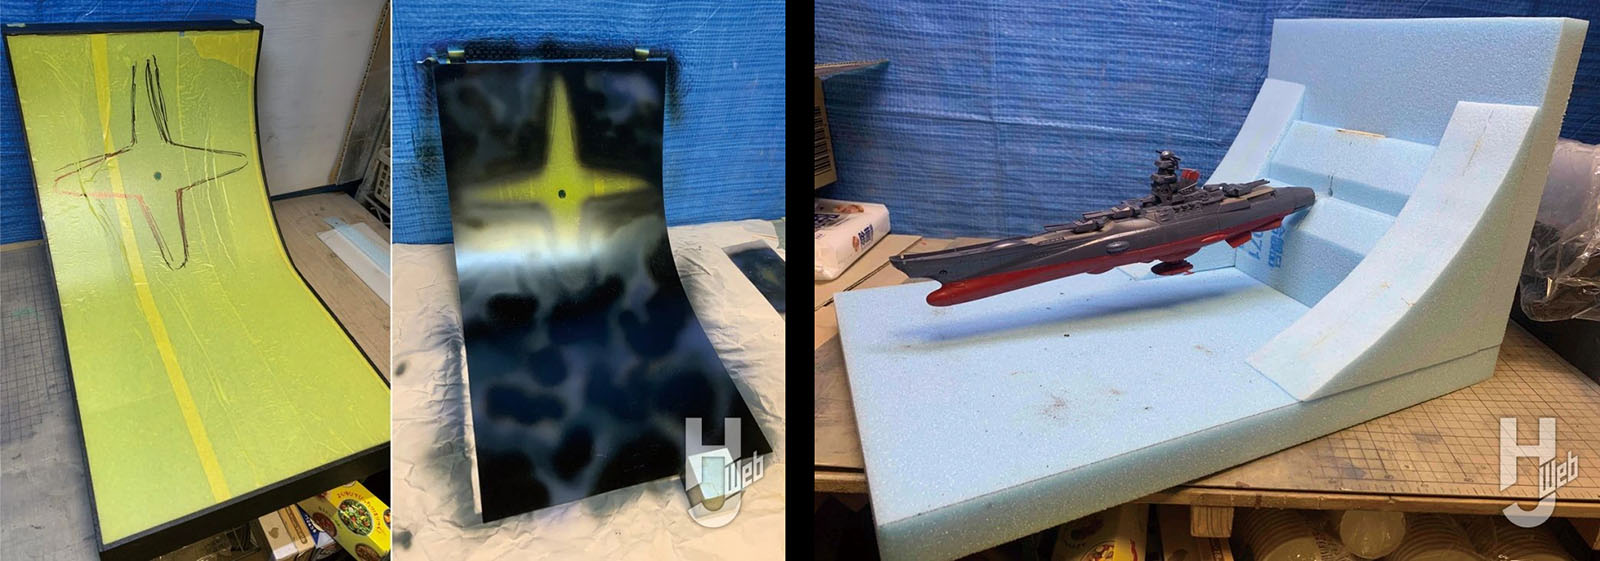
The rough shape was created with styrofoam, and the frame was made with 4mm plywood. The curved surface was fixed by bending PVC boards. Masking tape was applied to the entire PVC board, and after drawing the outline of a cross, it was painted from the back. The light from the LED strips was too strong as it was, so calligraphy paper was applied to the PVC board to adjust the intensity and diffuse the light.
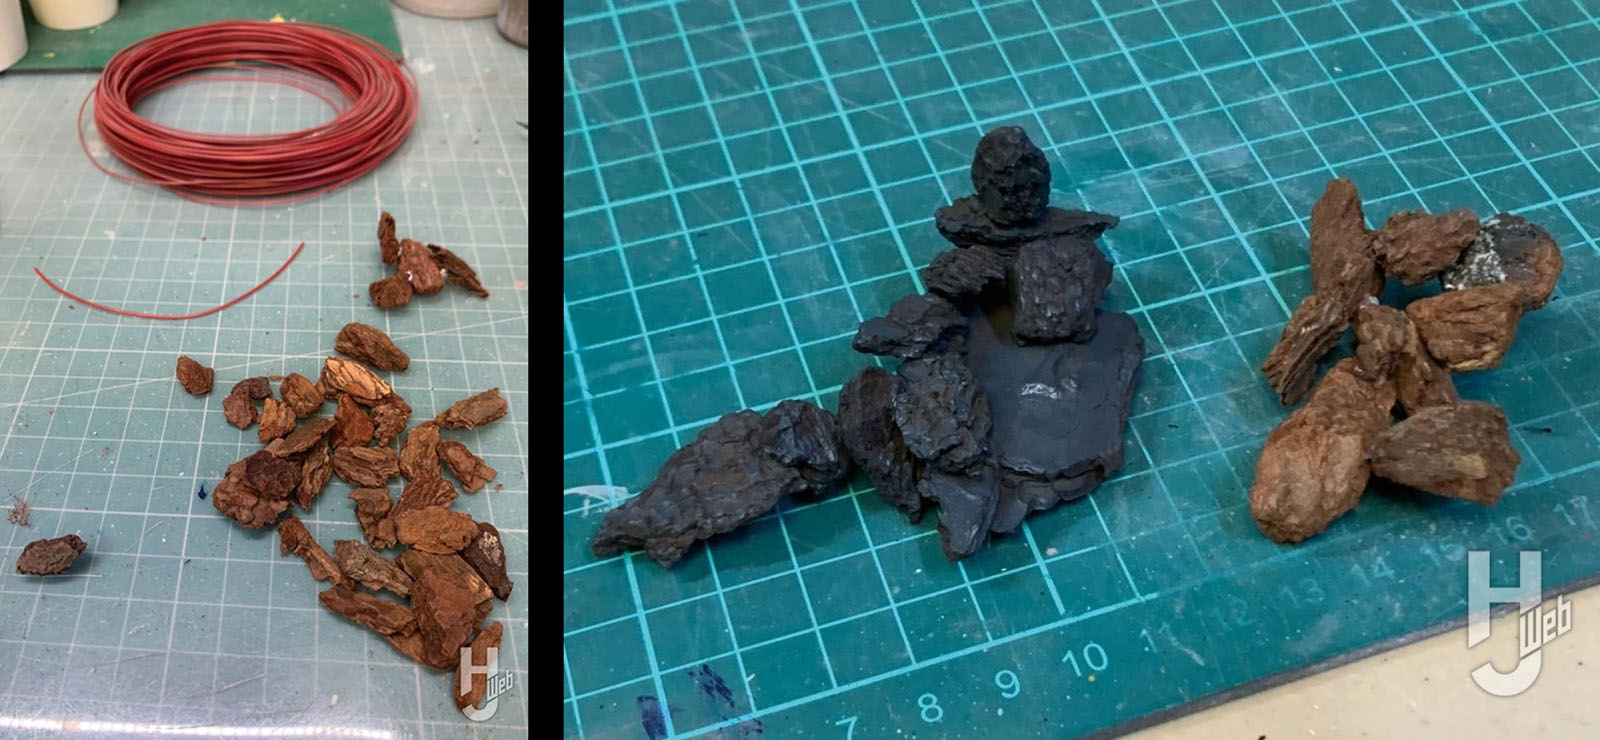
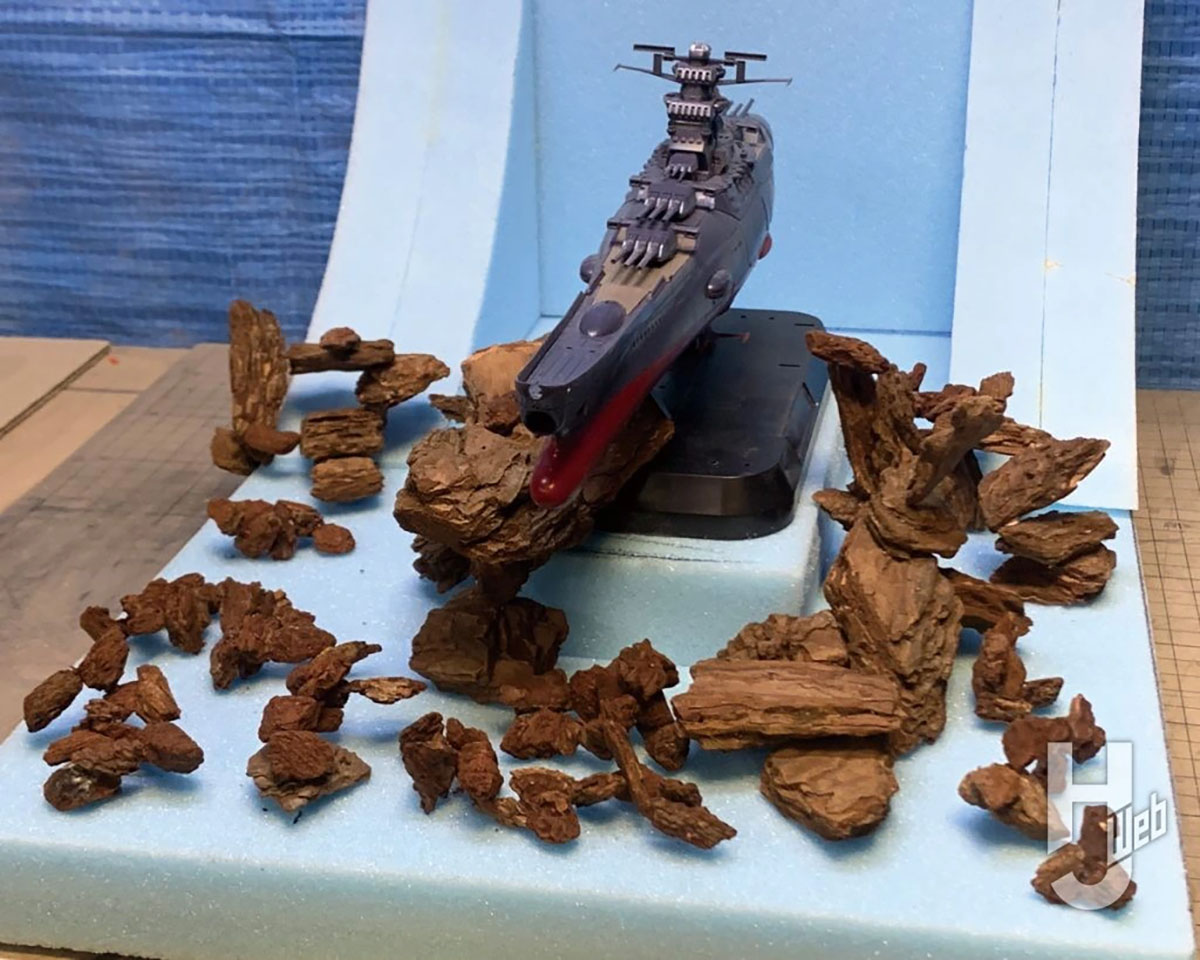
The floating rocks are bark chips, a gardening product. I mixed about three different sizes of rocks purchased from hardware stores and 100-yen shops. The rocks are connected to each other with soft aluminum wire. After placing them, some adjustments could be made, and they were finally readjusted after placing Yamato.
Since the “Iscandar Incident,” Yamato fought against three different opponents, Garmillas, Gatlantis, and Dezarium, and achieved great results. It returned safely, and was awarded a participation medal for its achievements. When the Earth government hosted the award ceremony for Space Battleship Yamato, it painted three stripes on the tips of the main and secondary gun barrels as a participation medal, and gave each squadron an anchor mark with a medal motif. This anchor mark was created by adding three rings to the Space Navy’s insignia as a participation medal, and is also called the Yamato mark. (excerpt from the official website)
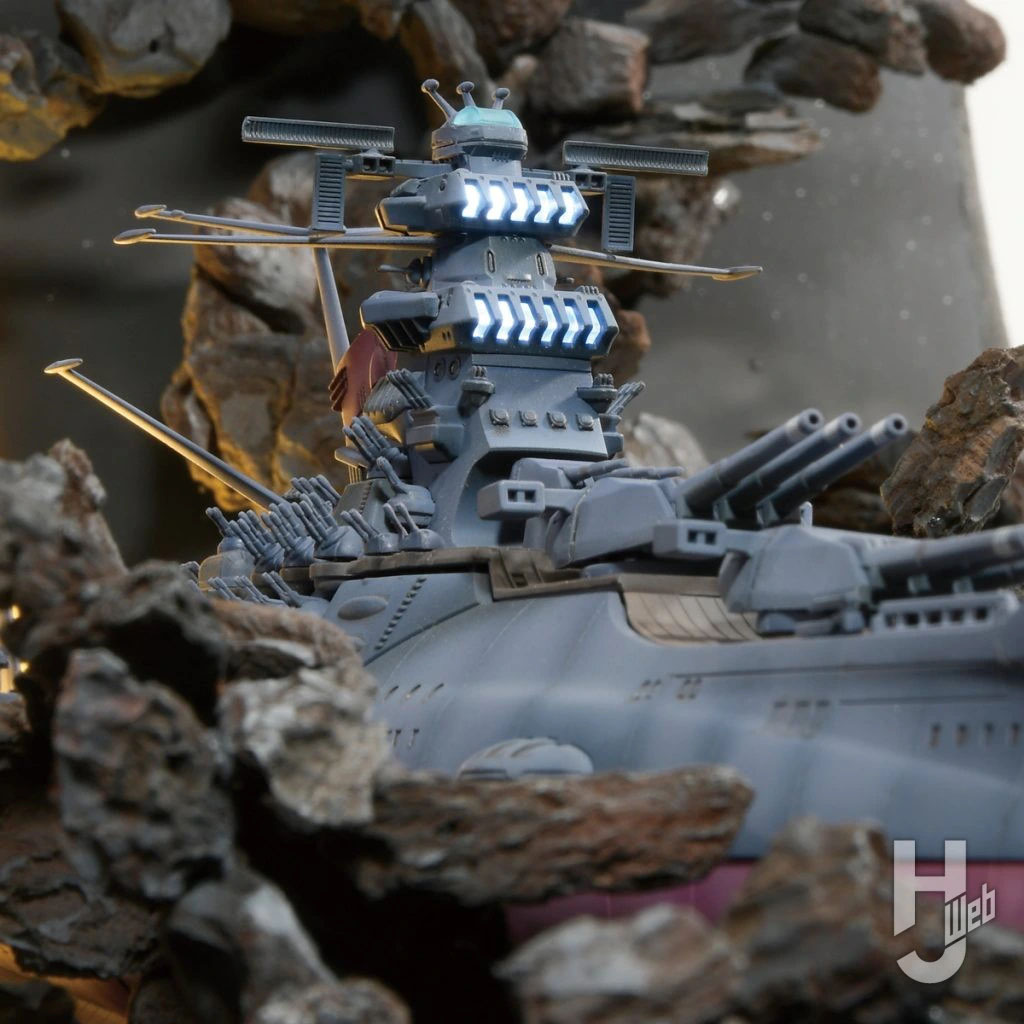
Along with the base, the bridge also lights up using a power adapter. A light source was secured by running wiring inside the support rod on the Wave-Motion Engine side. When the ship sets out, the captain is assumed to be on the first bridge. The captain’s room is not illuminated.
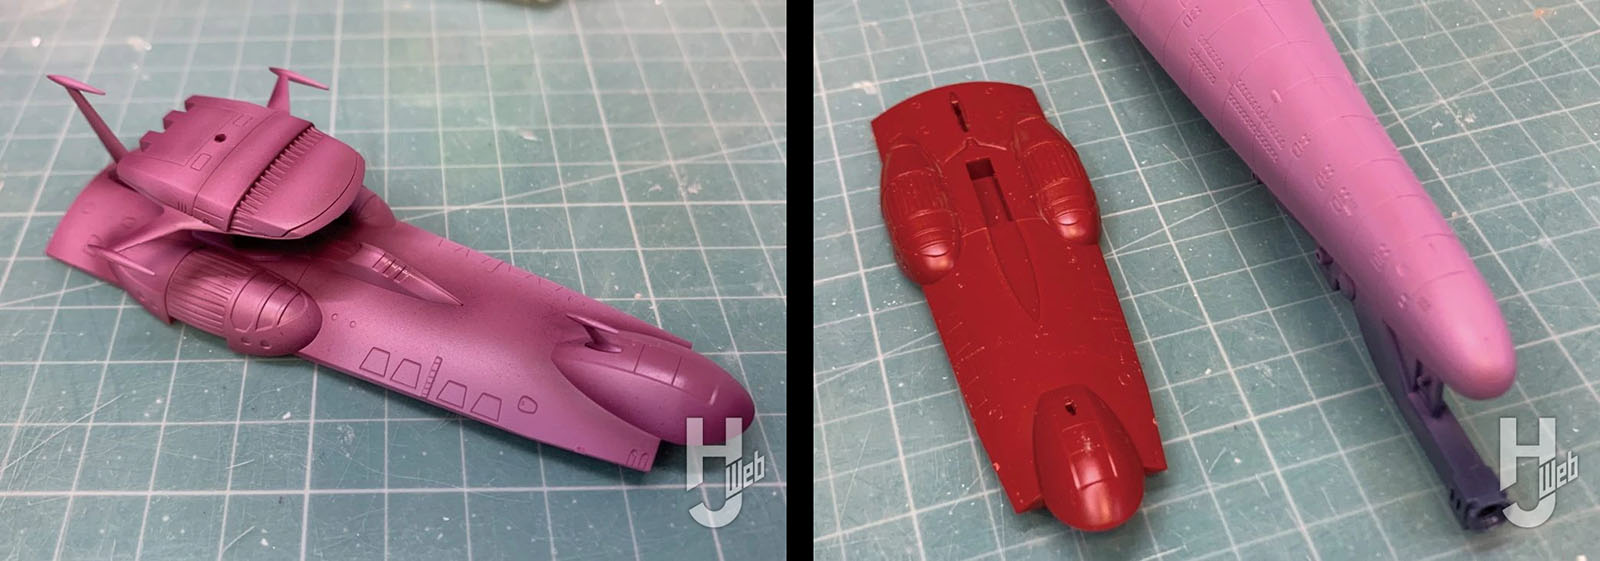
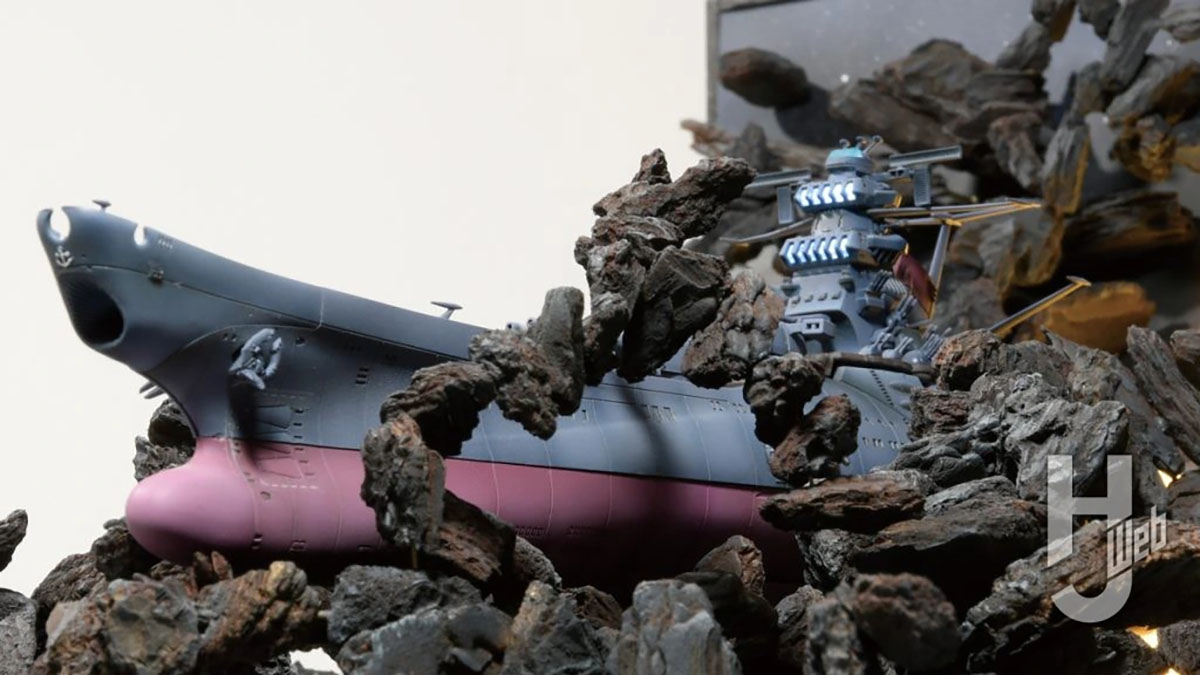
The base color of the paint is mixed with the surfacer to create the atmosphere of the illustration, giving it a low saturation and high brightness balance.
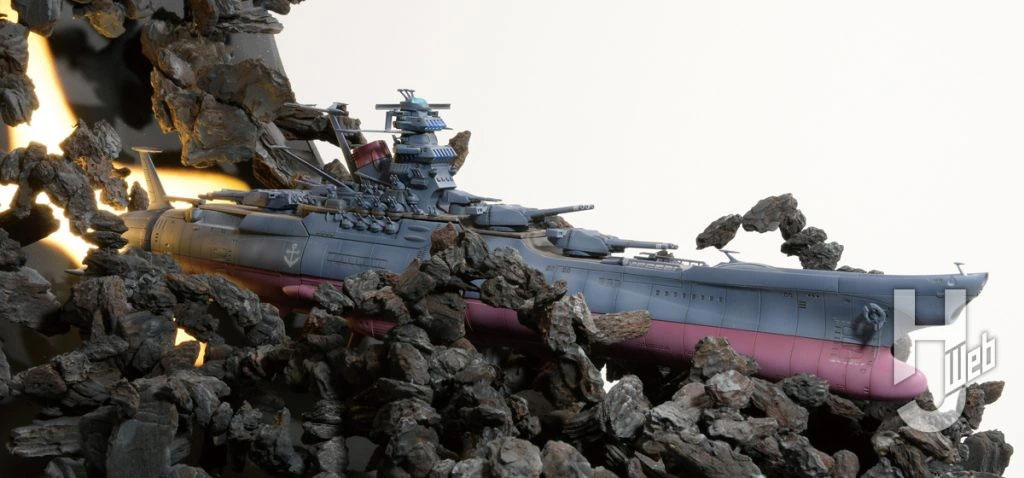
Shadows from the backlight on the dimensional navigation device, first and second main guns, and the front of the bridge are drawn in clear black, giving a strong sense of the direction of the light.
In Chapter 2, Red Sun Sortie, Yamato finally sets out. It will be exciting to see how it will fight back. The poster drawn by Kia Asamiya, which was released prior to the screening, may remind many older generations of the asteroid belt. This diorama is produced with the theme of recreating the poster, which would also serve as a display model for the Bandai Spirits booth at the All Japan Model Hobby Show held on October 12 and 13. How to make the rocks float? That was the key.
New parts have been added to the 3199 Yamato, such as detail on the side of the hull and the relief of the anchor on the bow, making it a must-have for those who already own previous kits. This time, it is being assembled as straight as possible, since it is also being used to announce new products. In order to make the internal lights light up in conjunction with the base, only the wiring has been processed and the axis has been passed through the wave engine and the third bridge. Instead, the focus has been on the painting to reproduce the image in Asamiya’s poster. Fine color adjustments have been made, and the shadows that seem to be backlit have been reproduced in detail with a gradation spray.
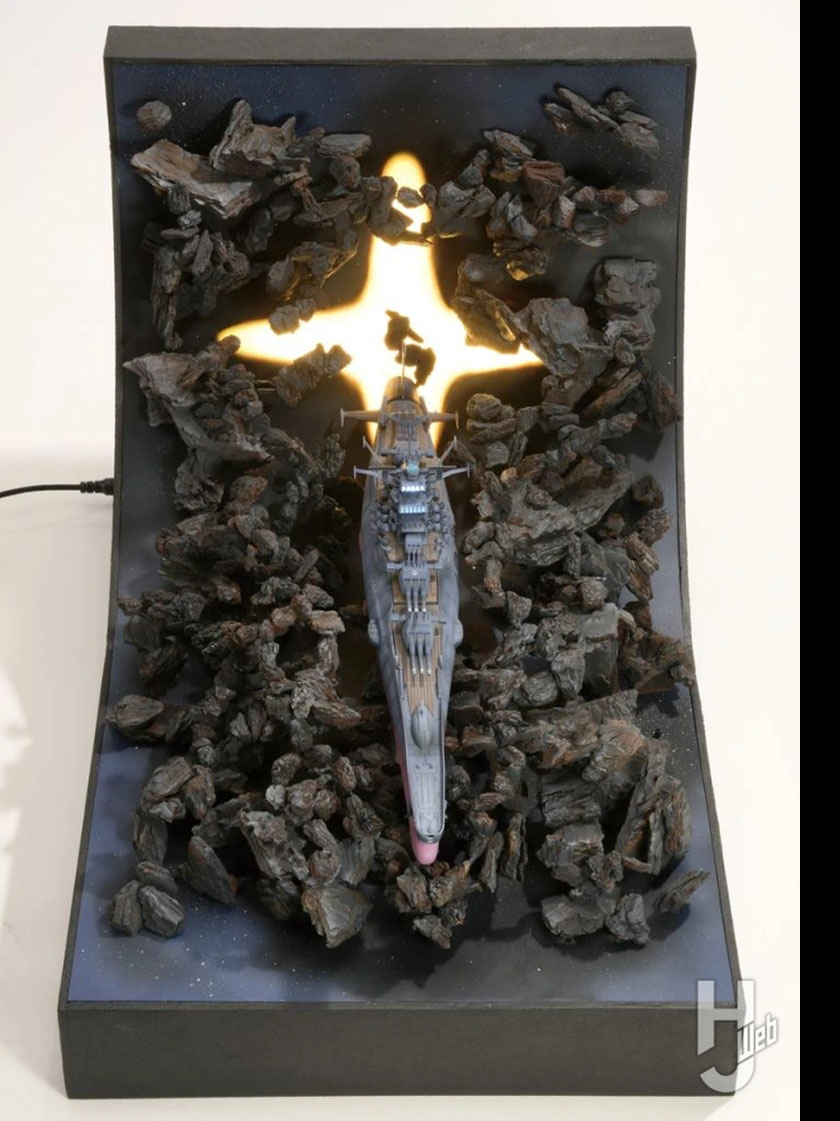
In order to curve the display base and prevent corners from appearing, the approximate shape and size were considered using Styrofoam, and then a frame was made out of 4mm plywood, and a 0.5mm PVC board was inserted to depict the space background and the luminous parts of the cross.
The back side of the transparent PVC board was airbrushed with mottled paints of midnight blue, iron blue, and black. The cross is painted clear yellow and clear orange to allow the light from the built-in LED strips to shine through. Then, water-based white acrylic is spattered onto the front to create stars, which are then protected with a matte clear coat.
The floating rocks are made from gardening bark chips, which come in a variety of sizes and shapes and are lightweight (this is important). I bought about three different types at home improvement stores and 100-yen shops, and mixed them together. First, I used a router to drill pilot holes in the bark chips to pass soft 1mm aluminum wire through, and then I threaded 5 to 10 pieces through them like beads. When the wire became too straight, I branched it into two or three at some point, and built it block by block to make it look unstable. By making the base a relatively large block, it becomes a base onto which I can insert multiple beads made earlier. I used brass wire to ensure that the wire could be firmly inserted into the PVC board.
The entire surface is coated with Meca-Surfacer Heavy so that the base color can be faintly seen through, and dry brushing is applied to the part close to the bow to enhance the contrast.